Install OMC Data Collector To Harvest Oracle Enterprise Manager Target’s Metric Data

In order to make use of the data you already have in your Oracle Enterprise Manager (OEM) in Oracle’s Management Cloud (OMC) you need to install and configure the OMC’s Data Collector agent.
Here’s how you do it.
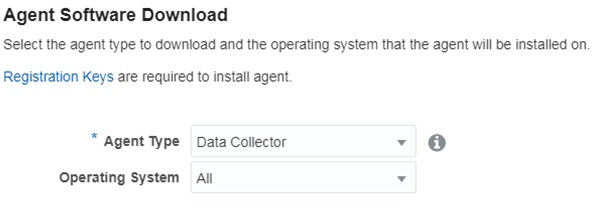
Login to OMC and navigate to Administration -> Agents -> Download
In the Agent Type box, select Data Collector.

Select the desired Operating System version. In my case is Linux 64 bit.

Once the agent is downloaded, take a note in the same OMC’s web page of the TENANT_ID and the UPLOAD_ROOT values.
Next login to the server hosting your OEM Repository database.
Create a directory in a place where you have enough space (3GB).
$ cd /u01/agent
$ mkdir omc
$ cd omc
Transfer the downloaded file to this new directory and unzip it.
$ ls
datacollector_linux.x64_1.23.0.zip
$ unzip datacollector_linux.x64_1.23.0.zip
Archive:  datacollector_linux.x64_1.23.0.zip
  inflating: unzip
  inflating: AgentDeployment.sh
  inflating: agentimage.properties
  inflating: agent.rsp
  inflating: agent_software_build.xml
 extracting: agentcoreimage.zip
  inflating: AgentInstall.sh
Modify the response file adding the required values. This step depends in whether you’re using a Gateway or a Proxy to connect to the OMC.
$ vi agent.rsp
All required values can be found here.
Now execute the installation.
$ ./AgentInstall.sh
Unzipping agent software, this may take some time…
Installing Data Collector…
Data Collector parameter validation started…
Skipping Data Collector pre-requisite checks as IGNORE_VALIDATIONS is set to true…
Data Collector base directory creation started…
Security artifacts download started…
Data Collector setup started…
Registering Data Collector…
Starting Data Collector…
Data Collector started.
Data Collector installation completed.
The following configuration scripts need to be executed as the root user:
/bin/sh /u01/agent/omc/datacollector/core/1.23.0/root.sh
You now need to execute the configuration script as root.
Once this is executed, go and verify the Data Collector agent is up and running.
$ cd /u01/agent/omc/datacollector/agent_inst/bin
./omcli status agent
Oracle Management Cloud Data Collector
Copyright (c) 1996, 2017 Oracle Corporation.  All rights reserved.
—————————————————————
Version                : 1.23.0
Started at             : 2017-04-07 11:45:04
Started by user        : oracle
Operating System       : Linux version 4.1.17-12.3.5.el6uek.x86_64 (amd64)
Data Collector enabled : true
Sender Status          : FUNCTIONAL
Gateway Upload Status  : FUNCTIONAL
Last successful upload : 2017-04-07 11:46:28
Last attempted upload  : 2017-04-07 11:46:27
Pending Files (MB)     : 2.26
Pending Files          : 80
Backoff Expiration     : (none)
—————————————————————
Agent is Running and Ready
Verify the OMC’s Data Collector in the OMC console.
Navigate to Agents -> Administration -> Data Collectors
In this page you should see your newly installed Data Collector Agent.
Thanks,
Alfredo

_optimizer_distinct_placement

I remember seeing this hidden parameter in the past (11.2.0.3) and that had an issue when querying v$temp_extent_map view. 
This view returned wrong results if this parameter was set to true.
Now is a different story in 12.1.0.2. 
We started to see many ORA-600 [kkqcscpopnWithMap: 0] errors. 
Turns out is because of the same parameter.
MOS note “Query Errors With ORA-600 [kkqcscpopnWithMap: 0] (Doc ID 2260457.1)" gives a workaround and a patch to be applied.
After applying the patch no more errors in the alert log.

This patch is non-Data Guard Standby-First Installable

During a DB patching I found this note in the patch README file.
This patch is non-Data Guard Standby-First Installable - 
Please read My Oracle Support Note 1265700.1 
https://support.us.oracle.com/oip/faces/secure/km/DocumentDisplay.jspx?id=1265700.1
This is the first time I see this, so I was curious about this as Oracle recommends to apply the patches first to the standby database and then patch the primary database.
After reading the note id 1265700.1, found that we must shutdown both the primary and the standby and apply the patches at the same time.
This worked well and both databases were patched.
Thanks,
Alfredo

Oracle Database 12.2 New Features – SQL* Plus Enhancements

I want to start a series of posts about Oracle Database 12.2 new features this new year 2018.
There’s no better start of this series than to start with SQL*Plus.
SQL*Plus is probably one of the most utilized tools by DBA’s (sqlcl is gaining steam) and here I show some really cool new features.

SQL*Plus History

With this command HIST[ORY] and if turned on; you can run, edit, delete or list previously used SQL or PL/SQL commands for the current session.
  
 $ sqlplus sys as sysdba
SQL*Plus: Release 12.2.0.1.0 Production on Fri Jan 5 12:28:58 2018
Copyright (c) 1982, 2016, Oracle.  All rights reserved.
Enter password:
Connected to:
Oracle Database 12c Enterprise Edition Release 12.2.0.1.0 – 64bit Production
SQL> show history
history is OFF
SQL> set history on
SQL> show history
history is ON and set to “100”
SQL> set history 1000
SQL> show history
history is ON and set to “1000”
SQL> show user
USER is “SYS”
SQL> desc dual
 Name                                                      Null?    Type
 —————————————– ——– —————————-
 DUMMY                                                                 VARCHAR2(1)
SQL> select * from dual;
D
X
SQL> hist
  1  show history
  2  show user
  3  desc dual
  4  select * from dual;
SQL> hist 4 run
D
X
SQL>

SQL*Plus SET MARKUP CSV

This setting is going to present the output is CVS format. 
SQL> set markup csv on
SQL> select * from emp;
“EMPNO”,”ENAME”,”JOB”,”MGR”,”HIREDATE”,”SAL”,”COMM”,”DEPTNO”
7839,”KING”,”PRESIDENT”,,”17-NOV-81″,5000,,10
7698,”BLAKE”,”MANAGER”,7839,”01-MAY-81″,2850,,30
7782,”CLARK”,”MANAGER”,7839,”09-JUN-81″,2450,,10
7566,”JONES”,”MANAGER”,7839,”02-APR-81″,2975,,20
7788,”SCOTT”,”ANALYST”,7566,”19-APR-87″,3000,,20
7902,”FORD”,”ANALYST”,7566,”03-DEC-81″,3000,,20
7369,”SMITH”,”CLERK”,7902,”17-DEC-80″,800,,20
7499,”ALLEN”,”SALESMAN”,7698,”20-FEB-81″,1600,300,30
7521,”WARD”,”SALESMAN”,7698,”22-FEB-81″,1250,500,30
7654,”MARTIN”,”SALESMAN”,7698,”28-SEP-81″,1250,1400,30
7844,”TURNER”,”SALESMAN”,7698,”08-SEP-81″,1500,0,30
7876,”ADAMS”,”CLERK”,7788,”23-MAY-87″,1100,,20
7900,”JAMES”,”CLERK”,7698,”03-DEC-81″,950,,30
7934,”MILLER”,”CLERK”,7782,”23-JAN-82″,1300,,10
14 rows selected.

SQL*Plus SET FEEDBACK ONLY

This option will display the number of rows selected without displaying the data. Useful to measure fetch time.
SQL> set feedback only
SQL> set timing on
SQL> select * from emp;
14 rows selected.
Elapsed: 00:00:00.01

SQL*Plus Performance Settings


SET ROWPREFECTH (default 1 | 2G max)
This setting pre-fetches rows in a result set. It can reduce the number of round trips between OCI execute calls.
I had an interesting question from a colleague about this setting. What is the difference between this ROWPREFECTH and ARRAYSIZE?
I’m still struggling to find the differences. Here are both definitions extracted from Oracle’s documentation:
SET ARRAYSIZE
Sets the number of rows that SQL*Plus will fetch from the database at one time. Valid values are 1 to 5000.
The effectiveness of setting ARRAYSIZE depends on how well Oracle Database fills network packets and your network latency and throughput. In recent versions of SQL*Plus and Oracle Database, ARRAYSIZE may have little effect. Overlarge sizes can easily take more SQL*Plus memory which may decrease overall performance.

SET ROWPREFETCH {1 | n}

Sets the number of rows that SQL*Plus will prefetch from the database at one time.
The default value is 1.
What I can see from here is that ARRAYSIZE takes place during the fetch step and probably ROWPREFECTH is just before the fetch step?
I even tried to identify this by using the autotrace option and by tracing a test session, but unfortunately I was not able to find any differences. Maybe the amount of data queried wasn’t large enough.
$ sqlplus scott/****
SQL*Plus: Release 12.2.0.1.0 Production on Fri Jan 5 13:18:41 2018
Copyright (c) 1982, 2016, Oracle.  All rights reserved.
Last Successful login time: Fri Jan 05 2018 13:15:53 -05:00
Connected to:
Oracle Database 12c Enterprise Edition Release 12.2.0.1.0 – 64bit Production
SQL> set autotrace on
SQL> select * from emp;
14 rows selected.
Execution Plan
———————————————————-
Plan hash value: 3956160932
————————————————————————–
| Id  | Operation         | Name | Rows  | Bytes | Cost (%CPU)| Time    |
————————————————————————–
|   0 | SELECT STATEMENT  |         |    14 |  1218 |     3   (0)| 00:00:01 |
|   1 |  TABLE ACCESS FULL| EMP  |    14 |  1218 |     3   (0)| 00:00:01 |
————————————————————————–
Note
—–
   – dynamic statistics used: dynamic sampling (level=2)
Statistics
———————————————————-
            0  recursive calls
            0  db block gets
            8  consistent gets
            0  physical reads
            0  redo size
       1537  bytes sent via SQL*Net to client
          608  bytes received via SQL*Net from client
            2  SQL*Net roundtrips to/from client
            0  sorts (memory)
            0  sorts (disk)
           14  rows processed
SQL> set rowprefetch 10
SQL> select * from emp;
14 rows selected.
Execution Plan
———————————————————-
Plan hash value: 3956160932
————————————————————————–
| Id  | Operation         | Name | Rows  | Bytes | Cost (%CPU)| Time    |
————————————————————————–
|   0 | SELECT STATEMENT  |         |    14 |  1218 |     3   (0)| 00:00:01 |
|   1 |  TABLE ACCESS FULL| EMP  |    14 |  1218 |     3   (0)| 00:00:01 |
————————————————————————–
Note
—–
   – dynamic statistics used: dynamic sampling (level=2)
Statistics
———————————————————-
            0  recursive calls
            0  db block gets
            8  consistent gets
            0  physical reads
            0  redo size
       1534  bytes sent via SQL*Net to client
          608  bytes received via SQL*Net from client
            2  SQL*Net roundtrips to/from client
            0  sorts (memory)
            0  sorts (disk)
           14  rows processed
SQL> set rowprefetch 5
SQL> select * from emp;
14 rows selected.
Execution Plan
———————————————————-
Plan hash value: 3956160932
————————————————————————–
| Id  | Operation         | Name | Rows  | Bytes | Cost (%CPU)| Time    |
————————————————————————–
|   0 | SELECT STATEMENT  |         |    14 |  1218 |     3   (0)| 00:00:01 |
|   1 |  TABLE ACCESS FULL| EMP  |    14 |  1218 |     3   (0)| 00:00:01 |
————————————————————————–
Note
—–
   – dynamic statistics used: dynamic sampling (level=2)
Statistics
———————————————————-
            0  recursive calls
            0  db block gets
            8  consistent gets
            0  physical reads
            0  redo size
       1534  bytes sent via SQL*Net to client
          608  bytes received via SQL*Net from client
            2  SQL*Net roundtrips to/from client
            0  sorts (memory)
            0  sorts (disk)
           14  rows processed
SQL> set arraysize 5
SQL> select * from emp;
14 rows selected.
Execution Plan
———————————————————-
Plan hash value: 3956160932
————————————————————————–
| Id  | Operation         | Name | Rows  | Bytes | Cost (%CPU)| Time    |
————————————————————————–
|   0 | SELECT STATEMENT  |         |    14 |  1218 |     3   (0)| 00:00:01 |
|   1 |  TABLE ACCESS FULL| EMP  |    14 |  1218 |     3   (0)| 00:00:01 |
————————————————————————–
Note
—–
   – dynamic statistics used: dynamic sampling (level=2)
Statistics
———————————————————-
            0  recursive calls
            0  db block gets
            8  consistent gets
            0  physical reads
            0  redo size
       1534  bytes sent via SQL*Net to client
          608  bytes received via SQL*Net from client
            2  SQL*Net roundtrips to/from client
            0  sorts (memory)
            0  sorts (disk)
           14  rows processed
SQL> set rowprefetch 1
SQL> select * from emp;
14 rows selected.
Execution Plan
———————————————————-
Plan hash value: 3956160932
————————————————————————–
| Id  | Operation         | Name | Rows  | Bytes | Cost (%CPU)| Time    |
————————————————————————–
|   0 | SELECT STATEMENT  |         |    14 |  1218 |     3   (0)| 00:00:01 |
|   1 |  TABLE ACCESS FULL| EMP  |    14 |  1218 |     3   (0)| 00:00:01 |
————————————————————————–
Note
—–
   – dynamic statistics used: dynamic sampling (level=2)
Statistics
———————————————————-
            0  recursive calls
            0  db block gets
           10  consistent gets
            0  physical reads
            0  redo size
       1919  bytes sent via SQL*Net to client
          630  bytes received via SQL*Net from client
            4  SQL*Net roundtrips to/from client
            0  sorts (memory)
            0  sorts (disk)
           14  rows processed
As you can see the only visible changes are the SQL*Net roundtrips to/from client of the ARRAYSIZE setting.
SET LOBPREFETCH (default 0 bytes | 2G max)
Similar to ROWPREFECTH but for LOB data.

SET STATEMENTCACHE (default 0 | 32767 max)
This setting will cache similar SQL statements for the current session reducing the amount of necessary parses.
Thanks,

Alfredo

Upload the OPatch that is of version “13.8.0.0.0” and platform “226” to the Software Library

I was having an issue trying to deploy a patch to an agent due to the version of OPatch available in the software library.
The error I got was “Upload the OPatch that is of version “13.8.0.0.0” and platform “226” to the Software Library”

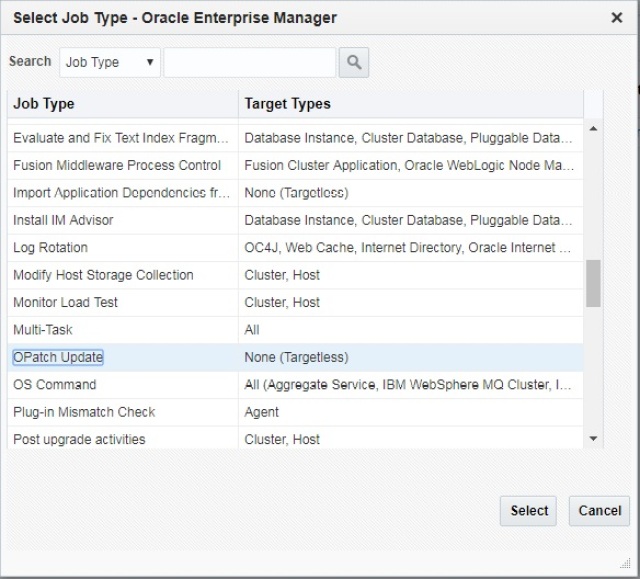
The solution was to run the “OPatch Update” job available from the job console in OEM.

Choose “OPatch Update” as job type:

Type a name for the job:

And click submit:

After this the agent patching was successful.
Thanks,
Alfredo

“Failed to find the OPatch patch directory” while applying patch 25105555 ( 13.2.0.0.161231) from OEM console

While applying patch 25105555 ( 13.2.0.0.161231) to an agent using the “provisioning and Patching” console from OEM 13.2 and choosing the “Upgrade OPatch” option, got this error:
———- Error Message ———-
Error: 010
Failed to find the OPatch patch directory “/tmp/p6880880_600000000057471_2000_0/oracle/OPatch”.
If you chose “No” for the “StagePatches” option, ensure that you manually place the patch at the required location and retry the operation.
———– End Message ———–
Tue Aug 27 15:41:48 2017 – Patching aborted.
You have to follow the solution section from below MOS note:
EM 13c: Applying EM-AGENT Bundle Patch 25105555 ( 13.2.0.0.161231) from Enterprise
Manager 13.2 Cloud Control Fails with Message: Error: 010 Failed to find the OPatch patch directory (Doc ID 2229452.1)
It depends on whether you have an online or offline OMS configuration.
After doing this I was able to apply patch 25105555 to the agent.
Hope this helps.

Alfredo

RMAN restore slow due to ASMB process from ASM to filesystem

I was restoring a database running on ASM to an instance running on filesystem.
The step for cataloging files was extremely slow and after taking a look at the alertlog file, I noticed tons of errors related to ASMB process.
Well, turns out this is an unpublished bug explained in more detail on the below MOS note.
12c RMAN Operations from ASM To Non-ASM Slow Performance (Doc ID 2081537.1)
After applying the suggested patch (19503821) the performance went back to normal and the restore progressed as expected.
Thanks,

Alfredo

2017 April PSU – OEM sending tablespace related alerts every collection schedule

I noticed that several alerts related to tablespace full were sent from OEM every collection schedule. At first sight I thought this may be related to OEM itself but after spending some significant time in MOS found a bug note stating that the 2017 April PSU patch was responsible.


The issue is that dba_tablespace_usage_metrics is not accounting for autoextend datafiles. So even if you add a new datafile, your used space will continue be reported as it was before.
You need to apply patch 26198757 on top of April PSU.
Hope this help you to avoid all this noise and happy patching.
Thanks,

Alfredo

Oracle Management Cloud – Setup Entities in Log Analytics

In order to gather Weblogic’s Admin Server and Managed Server log files, you need first to install and configure the OMC Cloud Agent.  
Then you need to verify that the Cloud Agent is up and running.  Refer to my previous post on how to manage the Cloud Agent.
The next step is to setup the Log Analytics entities. In order to do this you have to make use of a JSON template. Oracle provides examples of these templates in the OMC documentation:
In this example we are going to add a Weblogic Admin Server and Managed server as Cloud Agent entities.
Unzip the example zip file and modify the omc_weblogic_domain_credless.json file.
The data added to this file really depends on your environment. This is how it looks for my environment:
{
   “entities”:[
      {
         “name”:”base_domain”,
         “type”:”omc_weblogic_domain”,
         “displayName”:”Weblogic_on_”,
         “timezoneRegion”:”PST”,
         “properties”:{
            “port”:{
               “displayName”:”Port”,
               “value”:”7001″
            },
            “domain_home”:{
               “displayName”:”Domain Home”,
               “value”:”/u01/app/oracle/product/ofm12.1.2/user_projects/domains/base_domain”
            },
            “admin_server_host”:{
               “displayName”:”AdminServer”,
               “value”:”.”
            },
            “webLogic_home”:{
               “displayName”:”WebLogic Home”,
               “value”:”/u01/app/oracle/product/ofm12.1.2/wlserver”
            }
         },
         “associations”:[
            {
               “assocType”:”omc_contains”,
               “sourceEntityName”:”base_domain”,
               “sourceEntityType”:”omc_weblogic_domain”,
               “destEntityName”:” __AdminServer”,
               “destEntityType”:”omc_weblogic_j2eeserver”
            }
         ]
      },
      {
         “name”:”_AdminServer”,
         “type”:”omc_weblogic_j2eeserver”,
         “displayName”:”AdminServer_”,
         “timezoneRegion”:”PST”,
         “properties”:{
            “host_name”:{
               “displayName”:”Weblogic Host”,
               “value”:”.”
            },
            “domain_home”:{
               “displayName”:”Domain Home”,
               “value”:”/u01/app/oracle/product/ofm12.1.2/user_projects/domains/base_domain”
            },
            “listen_port”:{
               “displayName”:”Listen Port”,
               “value”:”7001″
            },
            “listen_port_enabled”:{
               “displayName”:”Listen Port Enabled”,
               “value”:”true”
            },
            “ssl_listen_port”:{
               “displayName”:”SSL Listen Port”,
               “value”:”7002″
            },
            “server_names”:{
               “displayName”:”Server Names”,
               “value”:”AdminServer”
            }
         },
         “associations”:[
            {
               “assocType”:”omc_monitored_by”,
               “sourceEntityName”:”_AdminServer”,
               “sourceEntityType”:”omc_weblogic_j2eeserver”,
               “destEntityName”:”base_domain”,
               “destEntityType”:”omc_weblogic_domain”
            }
         ]
      },
      {
         “name”:”_ManagedServer_1″,
         “type”:”omc_weblogic_j2eeserver”,
         “displayName”:”ManagedServer_1_”,
         “timezoneRegion”:”PST”,
         “properties”:{
            “host_name”:{
               “displayName”:”Weblogic Host”,
               “value”:”.”
            },
            “domain_home”:{
               “displayName”:”Domain Home”,
               “value”:”/u01/app/oracle/product/ofm12.1.2/user_projects/domains/base_domain”
            },
            “listen_port”:{
               “displayName”:”Listen Port”,
               “value”:”7003″
            },
            “listen_port_enabled”:{
               “displayName”:”Listen Port Enabled”,
               “value”:”true”
            },
            “ssl_listen_port”:{
               “displayName”:”SSL Listen Port”,
               “value”:”7005″
            },
            “server_names”:{
               “displayName”:”Server Names”,
               “value”:”ManagedServer_1″
            }
         },
         “associations”:[
            {
               “assocType”:”omc_monitored_by”,
               “sourceEntityName”:”_ManagedServer_1″,
               “sourceEntityType”:”omc_weblogic_j2eeserver”,
               “destEntityName”:”base_domain”,
               “destEntityType”:”omc_weblogic_domain”
            }
         ]
      }
   ]
}
Save this file and load the entities to the Cloud Agent as follows:
$ ./omcli add_entity agent /home/oracle/omc_weblogic.json
Oracle Management Cloud Agent 
Copyright (c) 1996, 2016 Oracle Corporation.  All rights reserved.
Operation Succeeded: Accepted 3 of 3 entities for processing.
As you can see, 3 entities were loaded to the agent; the base_domain, Admin Server and Managed Server.
Now verify the new entities in the Log Analytics configuration page.
–        Click on the “Navigation” icon.
–        Under “Cloud Services” click on “Log Analytics”
Click on “Configuration” located in the right side of the screen


In the “Entities” section. Click on the icon with the number (ie. 4)

You will see a list of the new entities just added.
Go back to “Log Explorer” by clicking on


In the search box type ‘Log Source’ = ‘FMW WLS Server Logs’


Click on “Run”


Check all the log information displayed for the WLS Server

This blog post is part of a series of blog posts related to the Oracle Management Cloud:
·                     What is the Oracle Management Cloud?
·                     Types of Oracle APM Agents
·                     Oracle Management Cloud – Cloud Agent Install
·                     Logging into Oracle APM Cloud Service for the first time
·                     Overview of Oracle APM Cloud Service features


Thanks,
Alfredo