Install OMC Data Collector To Harvest Oracle Enterprise Manager Target’s Metric Data

In order to make use of the data you already have in your Oracle Enterprise Manager (OEM) in Oracle’s Management Cloud (OMC) you need to install and configure the OMC’s Data Collector agent.
Here’s how you do it.
Login to OMC and navigate to Administration -> Agents -> Download
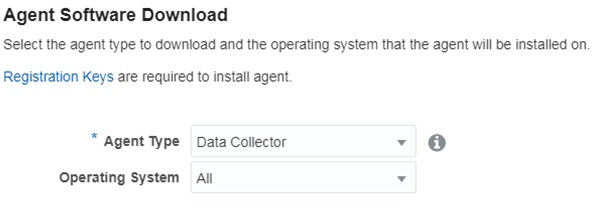
In the Agent Type box, select Data Collector.

Select the desired Operating System version. In my case is Linux 64 bit.

Once the agent is downloaded, take a note in the same OMC’s web page of the TENANT_ID and the UPLOAD_ROOT values.
Next login to the server hosting your OEM Repository database.
Create a directory in a place where you have enough space (3GB).
$ cd /u01/agent
$ mkdir omc
$ cd omc
Transfer the downloaded file to this new directory and unzip it.
$ ls
datacollector_linux.x64_1.23.0.zip
$ unzip datacollector_linux.x64_1.23.0.zip
Archive:  datacollector_linux.x64_1.23.0.zip
  inflating: unzip
  inflating: AgentDeployment.sh
  inflating: agentimage.properties
  inflating: agent.rsp
  inflating: agent_software_build.xml
 extracting: agentcoreimage.zip
  inflating: AgentInstall.sh
Modify the response file adding the required values. This step depends in whether you’re using a Gateway or a Proxy to connect to the OMC.
$ vi agent.rsp
All required values can be found here.
Now execute the installation.
$ ./AgentInstall.sh
Unzipping agent software, this may take some time…
Installing Data Collector…
Data Collector parameter validation started…
Skipping Data Collector pre-requisite checks as IGNORE_VALIDATIONS is set to true…
Data Collector base directory creation started…
Security artifacts download started…
Data Collector setup started…
Registering Data Collector…
Starting Data Collector…
Data Collector started.
Data Collector installation completed.
The following configuration scripts need to be executed as the root user:
/bin/sh /u01/agent/omc/datacollector/core/1.23.0/root.sh
You now need to execute the configuration script as root.
Once this is executed, go and verify the Data Collector agent is up and running.
$ cd /u01/agent/omc/datacollector/agent_inst/bin
./omcli status agent
Oracle Management Cloud Data Collector
Copyright (c) 1996, 2017 Oracle Corporation.  All rights reserved.
—————————————————————
Version                : 1.23.0
Started at             : 2017-04-07 11:45:04
Started by user        : oracle
Operating System       : Linux version 4.1.17-12.3.5.el6uek.x86_64 (amd64)
Data Collector enabled : true
Sender Status          : FUNCTIONAL
Gateway Upload Status  : FUNCTIONAL
Last successful upload : 2017-04-07 11:46:28
Last attempted upload  : 2017-04-07 11:46:27
Pending Files (MB)     : 2.26
Pending Files          : 80
Backoff Expiration     : (none)
—————————————————————
Agent is Running and Ready
Verify the OMC’s Data Collector in the OMC console.
Navigate to Agents -> Administration -> Data Collectors
In this page you should see your newly installed Data Collector Agent.
Thanks,
Alfredo
Oracle Management Cloud – Setup Entities in Log Analytics

In order to gather Weblogic’s Admin Server and Managed Server log files, you need first to install and configure the OMC Cloud Agent.  
Then you need to verify that the Cloud Agent is up and running.  Refer to my previous post on how to manage the Cloud Agent.
The next step is to setup the Log Analytics entities. In order to do this you have to make use of a JSON template. Oracle provides examples of these templates in the OMC documentation:
In this example we are going to add a Weblogic Admin Server and Managed server as Cloud Agent entities.
Unzip the example zip file and modify the omc_weblogic_domain_credless.json file.
The data added to this file really depends on your environment. This is how it looks for my environment:
{
   “entities”:[
      {
         “name”:”base_domain”,
         “type”:”omc_weblogic_domain”,
         “displayName”:”Weblogic_on_”,
         “timezoneRegion”:”PST”,
         “properties”:{
            “port”:{
               “displayName”:”Port”,
               “value”:”7001″
            },
            “domain_home”:{
               “displayName”:”Domain Home”,
               “value”:”/u01/app/oracle/product/ofm12.1.2/user_projects/domains/base_domain”
            },
            “admin_server_host”:{
               “displayName”:”AdminServer”,
               “value”:”.”
            },
            “webLogic_home”:{
               “displayName”:”WebLogic Home”,
               “value”:”/u01/app/oracle/product/ofm12.1.2/wlserver”
            }
         },
         “associations”:[
            {
               “assocType”:”omc_contains”,
               “sourceEntityName”:”base_domain”,
               “sourceEntityType”:”omc_weblogic_domain”,
               “destEntityName”:” __AdminServer”,
               “destEntityType”:”omc_weblogic_j2eeserver”
            }
         ]
      },
      {
         “name”:”_AdminServer”,
         “type”:”omc_weblogic_j2eeserver”,
         “displayName”:”AdminServer_”,
         “timezoneRegion”:”PST”,
         “properties”:{
            “host_name”:{
               “displayName”:”Weblogic Host”,
               “value”:”.”
            },
            “domain_home”:{
               “displayName”:”Domain Home”,
               “value”:”/u01/app/oracle/product/ofm12.1.2/user_projects/domains/base_domain”
            },
            “listen_port”:{
               “displayName”:”Listen Port”,
               “value”:”7001″
            },
            “listen_port_enabled”:{
               “displayName”:”Listen Port Enabled”,
               “value”:”true”
            },
            “ssl_listen_port”:{
               “displayName”:”SSL Listen Port”,
               “value”:”7002″
            },
            “server_names”:{
               “displayName”:”Server Names”,
               “value”:”AdminServer”
            }
         },
         “associations”:[
            {
               “assocType”:”omc_monitored_by”,
               “sourceEntityName”:”_AdminServer”,
               “sourceEntityType”:”omc_weblogic_j2eeserver”,
               “destEntityName”:”base_domain”,
               “destEntityType”:”omc_weblogic_domain”
            }
         ]
      },
      {
         “name”:”_ManagedServer_1″,
         “type”:”omc_weblogic_j2eeserver”,
         “displayName”:”ManagedServer_1_”,
         “timezoneRegion”:”PST”,
         “properties”:{
            “host_name”:{
               “displayName”:”Weblogic Host”,
               “value”:”.”
            },
            “domain_home”:{
               “displayName”:”Domain Home”,
               “value”:”/u01/app/oracle/product/ofm12.1.2/user_projects/domains/base_domain”
            },
            “listen_port”:{
               “displayName”:”Listen Port”,
               “value”:”7003″
            },
            “listen_port_enabled”:{
               “displayName”:”Listen Port Enabled”,
               “value”:”true”
            },
            “ssl_listen_port”:{
               “displayName”:”SSL Listen Port”,
               “value”:”7005″
            },
            “server_names”:{
               “displayName”:”Server Names”,
               “value”:”ManagedServer_1″
            }
         },
         “associations”:[
            {
               “assocType”:”omc_monitored_by”,
               “sourceEntityName”:”_ManagedServer_1″,
               “sourceEntityType”:”omc_weblogic_j2eeserver”,
               “destEntityName”:”base_domain”,
               “destEntityType”:”omc_weblogic_domain”
            }
         ]
      }
   ]
}
Save this file and load the entities to the Cloud Agent as follows:
$ ./omcli add_entity agent /home/oracle/omc_weblogic.json
Oracle Management Cloud Agent 
Copyright (c) 1996, 2016 Oracle Corporation.  All rights reserved.
Operation Succeeded: Accepted 3 of 3 entities for processing.
As you can see, 3 entities were loaded to the agent; the base_domain, Admin Server and Managed Server.
Now verify the new entities in the Log Analytics configuration page.
–        Click on the “Navigation” icon.
–        Under “Cloud Services” click on “Log Analytics”
Click on “Configuration” located in the right side of the screen


In the “Entities” section. Click on the icon with the number (ie. 4)

You will see a list of the new entities just added.
Go back to “Log Explorer” by clicking on


In the search box type ‘Log Source’ = ‘FMW WLS Server Logs’


Click on “Run”


Check all the log information displayed for the WLS Server

This blog post is part of a series of blog posts related to the Oracle Management Cloud:
·                     What is the Oracle Management Cloud?
·                     Types of Oracle APM Agents
·                     Oracle Management Cloud – Cloud Agent Install
·                     Logging into Oracle APM Cloud Service for the first time
·                     Overview of Oracle APM Cloud Service features


Thanks,
Alfredo

Oracle Management Cloud – Managing the Oracle Cloud Agent

This post is about some useful commands to administer the OMC’s Cloud agent. The very first step is to install the OMC Cloud agent. You may refer to my previous post on how to install it here.
The omcli command is located at /agent_inst/bin.
I’m skipping these 3 basic commands start, stop and status.
Here we go!
      List the targets currently managed by the Cloud agent
$ ./omcli config agent listtargets
Oracle Management Cloud Agent 
Copyright (c) 1996, 2016 Oracle Corporation.  All rights reserved.
[hostname.localdomain:1302, Lama]
[hostname.localdomain, omc_host_linux]
      Get the TimeZone of the server where the Cloud agent is running
$ ./omcli config agent getTZ
Oracle Management Cloud Agent 
Copyright (c) 1996, 2016 Oracle Corporation.  All rights reserved.
US/Eastern
      Get a detailed output of the Cloud agent scheduler
$ ./omcli status agent scheduler
Oracle Management Cloud Agent 
Copyright (c) 1996, 2016 Oracle Corporation.  All rights reserved.
—————————————————————
Number of currently running scheduled items :: 0
Number of currently ready scheduled items :: 0
Number of scheduled items :: 57
Schedule Attempts Delay Percentage :: 0.000%
Running entries::
Ready entries::
Scheduled entries::
2017-03-31 14:32:58.968 : HeapMonitorTask
2017-03-31 22:34:14.667 : PurgeTargetEvents
2017-03-31 22:35:47.885 : PurgeADR
2017-04-01 13:34:20.810 : EventStatusPurge
—————————————————————
Agent is Running and Ready
      Get a summary of the Cloud agent’s scheduler
$ ./omcli status agent scheduler -summary
Oracle Management Cloud Agent 
Copyright (c) 1996, 2016 Oracle Corporation.  All rights reserved.
—————————————————————
Number of currently running scheduled items :: 0
Number of currently ready scheduled items :: 0
Number of scheduled items :: 57
Schedule Attempts Delay Percentage :: 0.000%
—————————————————————
Agent is Running and Ready
      Dump the internal state of the agent [option component name]
$ ./omcli dumpstate agent
Oracle Management Cloud Agent 
Copyright (c) 1996, 2016 Oracle Corporation.  All rights reserved.
Generated file: /u01/omc/infra/agent_inst/sysman/emd/dumps/SystemDump_1490985620656.xml
      Dump internal information of all components of the Cloud agent
$ ./omcli dumpstate agent -dump_full_state
Oracle Management Cloud Agent 
Copyright (c) 1996, 2016 Oracle Corporation.  All rights reserved.
Generated file: /u01/omc/infra/agent_inst/sysman/emd/dumps/SystemDump_1490985775823.xml
      Add entities to the Cloud agent using JSON template
$ ./omcli add_entity agent /home/oracle/omc_weblogic.json
Oracle Management Cloud Agent 
Copyright (c) 1996, 2016 Oracle Corporation.  All rights reserved.
Operation Succeeded: Accepted 2 of 2 entities for processing.
      Delete entities from the Cloud agent using JSON template
$ ./omcli delete_entity agent /home/oracle/omc_weblogic.json
Oracle Management Cloud Agent 
Copyright (c) 1996, 2016 Oracle Corporation.  All rights reserved.
Request for removing the entities was accepted for processing.
This is just a small taste of all the options built into the Oracle’s Cloud agent.  For more information about all the options refer to Oracle’s documentation.
Thanks,

Alfredo

Oracle Management Cloud – Install the Cloud Agent

This is my first experience with the Oracle Cloud, in particular with Oracle Management Cloud (OMC). In this first post I will guide you through the installation of the Cloud Agent in a Linux host.
First you have to login to OMC and click on the navigation icon below.


It’ going to open the navigation screen that contains 4 sections; Home, Cloud Services, Explorers and Administration.


In the Administration section click on Agents.
In this page we are looking into 2 important items for us. Registration Keys and Download.


The way I see the Registration Keys is like the Agent Registration password in OEM 13c. You need a valid Registration Key to deploy your Cloud Agent. So, click on that link and verify that you have a Registration Key; if not, you can create one.   
Then proceed to download the agent by clicking on the Download link.
In order to install the Cloud Agent in the Linux host there are some pre-reqs to be met.
First verify that you have acl and libaio.i686 packages installed.
# rpm -q acl
acl-2.2.49-6.el6.x86_64
# rpm -qa|grep libaio
libaio-devel-0.3.107-10.el6.x86_64
libaio-0.3.107-10.el6.x86_64
libaio-0.3.107-10.el6.i686
Then move the AgentInstall.zip previously downloaded into an staging directory and unzip it.
$ mkdir –p /home/oracle/omc
$ mv AgentInstall.zip /home/oracle/omc
$ cd /home/oracle/omc
$ unzip AgentInstall.zip
$ $ ls
AgentInstall.bat  AgentInstall.sh  AgentInstall.zip  README
Create a folder to install the Cloud Agent.
$ mkdir –p /u01/omc/infra
Verify that the server has the FQN configured (name.domain_name).
$ hostname
ol6-121-plug.localdomain
Finally install the Cloud Agent.
$ ./AgentInstall.sh AGENT_TYPE=cloud_agent AGENT_REGISTRATION_KEY=R******************1  AGENT_BASE_DIR=/u01/omc/infra AGENT_PORT=1302 ORACLE_HOSTNAME=ol6-121-plug.localdomain
WARNING: The current cURL version 7.19.7 does not support TLS1.2 protocol; the downloader script will attempt to continue but may not work. Please install 7.49.1 or later versions of cURL for error-free execution.
Downloading lama agent software …
Generating emaas.properties …
Extracting Agent Software …
Installing the Agent …
Registering the Agent …
Downloading Certificates …
Configuring the Agent …
Cleanup temporary files …
Then you have to run the root script required after the installation.
# /u01/omc/infra/core/1.15.0/root.sh
/etc exist
/u01/omc/infra/core/1.15.0
Check the status of the Cloud Agent.
$ ./omcli status agent
Oracle Management Cloud Agent 
Copyright (c) 1996, 2016 Oracle Corporation.  All rights reserved.
—————————————————————
Version                : 1.15.0
State Home             : /u01/omc/infra/agent_inst
Log Directory          : /u01/omc/infra/agent_inst/sysman/log
Binaries Location      : /u01/omc/infra/core/1.15.0
Process ID             : 9828
Parent Process ID      : 9790
URL                    : https://ol6-121-plug.localdomain:1302/emd/main/
Started at             : 2017-03-20 20:49:15
Started by user        : oracle
Operating System       : Linux version 3.8.13-26.2.2.el6uek.x86_64 (amd64)
Data Collector enabled : false
Sender Status          : FUNCTIONAL
Gateway Upload Status  : FUNCTIONAL
Last successful upload : 2017-03-20 21:04:39
Last attempted upload  : 2017-03-20 21:04:38
Pending Files (MB)     : 0.01
Pending Files          : 14
Backoff Expiration     : (none)
—————————————————————
Agent is Running and Ready
Now if you go to the OMC portal, the agent will show up automatically.


Want to learn more about Oracle Management Cloud? There’s a free hands on lab “Cloud Experience” at Collaborate 2017 for all attendees on Wednesday 4/5/17.
Thanks,

Alfredo