Extract OCI Monitoring Metrics Using REST APIs

In my previous post I showed you how you can create custom metrics in order to monitor a Standby database. Those steps detailed how to ingest (post) metrics to the OCI Monitoring service.


In this post I’ll show you how you can list metric definitions and how you can extract metric data from the Monitoring service. This metric extraction is really useful when you need to integrate the Monitoring service with 3rd party tools.

Step 1 – Prerequisites

Please follow all the prerequisites executed in the previous blog.

Step 2 – List Metrics

In this step we are going to create the Python script that list our custom metric.

Copy the code below and paste it into a file name list_metric.py

#!/usr/bin/python3

# This is an automatically generated code sample.
# To make this code sample work in your Oracle Cloud tenancy,
# please replace the values for any parameters whose current values do not fit
# your use case (such as resource IDs, strings containing EXAMPLE or unique_id, and
# boolean, number, and enum parameters with values not fitting your use case).

import oci

# Create a default config using DEFAULT profile in default location
# Refer to
# https://docs.cloud.oracle.com/en-us/iaas/Content/API/Concepts/sdkconfig.htm#SDK_and_CLI_Configuration_File
# for more info
config = oci.config.from_file()


# Initialize service client with default config file
monitoring_client = oci.monitoring.MonitoringClient(config)


# Send the request to service, some parameters are not required, see API
# doc for more info
list_metrics_response = monitoring_client.list_metrics(
    compartment_id="<YOUR COMPARTMENT ID>",
    list_metrics_details=oci.monitoring.models.ListMetricsDetails(
        name="<YOUR METRIC NAME>",
        namespace="<YOUR CUSTOM NAMESPACE>"))


# Get the data from response
print(list_metrics_response.data)

Amend the inputs needed depending on your METRIC and OCI configuration:

  • <YOUR METRIC NAME>
  • <YOUR CUSTOM NAMESPACE>
  • <YOUR COMPARTMENT ID>

Let’s execute our script:

$ ./list_metric.py
[{
  "compartment_id": "<YOUR COMPARTMENT ID>",
  "dimensions": {
    "server_id": "<YOUR SERVER ID>"
  },
  "name": "<YOUR METRIC NAME>",
  "namespace": "<YOUR CUSTOM NAMESPACE>",
  "resource_group": null
}]

Step 3 – Query Metric Data

In this step we are going to create a Python script that query metric data.

Copy the code below and paste it into a file name query_metric.py

#!/usr/bin/python3

# This is an automatically generated code sample.
# To make this code sample work in your Oracle Cloud tenancy,
# please replace the values for any parameters whose current values do not fit
# your use case (such as resource IDs, strings containing EXAMPLE or unique_id, and
# boolean, number, and enum parameters with values not fitting your use case).

import oci
from datetime import datetime

# Create a default config using DEFAULT profile in default location
# Refer to
# https://docs.cloud.oracle.com/en-us/iaas/Content/API/Concepts/sdkconfig.htm#SDK_and_CLI_Configuration_File
# for more info
config = oci.config.from_file()


# Initialize service client with default config file
monitoring_client = oci.monitoring.MonitoringClient(config)


# Send the request to service, some parameters are not required, see API
# doc for more info
summarize_metrics_data_response = monitoring_client.summarize_metrics_data(
    compartment_id="<YOUR COMPARTMENT ID>",
    summarize_metrics_data_details=oci.monitoring.models.SummarizeMetricsDataDetails(
        namespace="<YOUR CUSTOM NAMESPACE>",
        query="<YOUR METRIC NAME>[1m].mean()",
        start_time=datetime.strptime(
            "2023-10-11T14:38:22.574Z",
            "%Y-%m-%dT%H:%M:%S.%fZ"),
        end_time=datetime.strptime(
            "2023-10-11T17:27:08.471Z",
            "%Y-%m-%dT%H:%M:%S.%fZ"),
        resolution="5m"),
    compartment_id_in_subtree=False)

# Get the data from response
string = ' '.join([str(item) for item in summarize_metrics_data_response.data])
json_object = json.loads(string)
print(json_object["aggregated_datapoints"])

Amend the inputs needed depending on your METRIC and OCI configuration:

  • <YOUR CUSTOM NAMESPACE>
  • <YOUR COMPARTMENT ID>
  • <YOUR METRIC NAME>

Let’s execute our script:

$ ./query_metric.py
[{'timestamp': '2023-10-11T14:41:00+00:00', 'value': 0.0}, {'timestamp': '2023-10-11T14:46:00+00:00', 'value': 0.016666667}, {'timestamp': '2023-10-11T14:51:00+00:00', 'value': 0.0}, {'timestamp': '2023-10-11T14:56:00+00:00', 'value': 0.0}, {'timestamp': '2023-10-11T15:01:00+00:00', 'value': 0.0}, {'timestamp': '2023-10-11T15:06:00+00:00', 'value': 0.0}, {'timestamp': '2023-10-11T15:11:00+00:00', 'value': 0.0}, {'timestamp': '2023-10-11T15:16:00+00:00', 'value': 0.0}, {'timestamp': '2023-10-11T15:21:00+00:00', 'value': 0.016666667}, {'timestamp': '2023-10-11T15:26:00+00:00', 'value': 0.0}, {'timestamp': '2023-10-11T15:31:00+00:00', 'value': 0.0}, {'timestamp': '2023-10-11T15:36:00+00:00', 'value': 0.0}, {'timestamp': '2023-10-11T15:41:00+00:00', 'value': 0.0}, {'timestamp': '2023-10-11T15:46:00+00:00', 'value': 0.0}, {'timestamp': '2023-10-11T15:51:00+00:00', 'value': 0.016666667}, {'timestamp': '2023-10-11T15:56:00+00:00', 'value': 0.0}, {'timestamp': '2023-10-11T16:01:00+00:00', 'value': 0.0}, {'timestamp': '2023-10-11T16:06:00+00:00', 'value': 0.0}, {'timestamp': '2023-10-11T16:11:00+00:00', 'value': 0.0}, {'timestamp': '2023-10-11T16:16:00+00:00', 'value': 0.0}, {'timestamp': '2023-10-11T16:21:00+00:00', 'value': 0.0}, {'timestamp': '2023-10-11T16:26:00+00:00', 'value': 0.0}, {'timestamp': '2023-10-11T16:31:00+00:00', 'value': 0.0}, {'timestamp': '2023-10-11T16:36:00+00:00', 'value': 0.0}, {'timestamp': '2023-10-11T16:41:00+00:00', 'value': 0.0}, {'timestamp': '2023-10-11T16:46:00+00:00', 'value': 0.0}, {'timestamp': '2023-10-11T16:51:00+00:00', 'value': 0.033333333}, {'timestamp': '2023-10-11T16:56:00+00:00', 'value': 0.0}, {'timestamp': '2023-10-11T17:01:00+00:00', 'value': 0.016666667}, {'timestamp': '2023-10-11T17:06:00+00:00', 'value': 0.0}, {'timestamp': '2023-10-11T17:11:00+00:00', 'value': 0.0}, {'timestamp': '2023-10-11T17:16:00+00:00', 'value': 0.0}, {'timestamp': '2023-10-11T17:21:00+00:00', 'value': 0.016666667}]

Now that we have extracted our metric data set, we can spool it off to a local file or ingest it into a 3rd party tool.

I also want to highlight another blog from Kay Singh about Monitoring metric extraction.


Hope this blog shows you how to extract Monitoring metric data from OCI.

Thanks,
Alfredo

Monitor Oracle Standby Databases In OCI With Custom Metrics

Monitoring Oracle Standby Database (Data Guard) has been always a tricky task. Just by the nature of them (the fact that the instance is not open in read-write mode) is hard to gather information about them. Even using specialized tools like Oracle Enterprise Manager requires SYSDBA credentials in order to effectively monitor them. But what about when running them on OCI?

Oracle OCI Monitoring service allow us to monitor cloud resources using metrics and alarms.

Oracle OCI Monitoring Service Architecture

In this post I want to show you how you can create a custom metric to monitor the “Apply Lag” on your Oracle Standby database, so you can create an alarm if it crosses a threshold.

I’m going to follow most of the steps detailed by Liu-Wei on this post “https://qiita.com/liu-wei/items/5e8e04f1e58cc6406ca9” .

Step 1 – Prerequisites

Add an API Key

First of all. You will have to designate an OCI user that has the proper permissions to access the Monitoring Service metrics and post them using custom metrics. This could be your account or a service account. Once you have designated this user, then login to the OCI console and choose the region where the Standby DB resides. Then click on the Profile icon and click on the account name.

Once there, scroll down and click on API Keys from the left menu.

Then click on the Add API Keys button.

Then generate the API Keys, save them nd store them in a secure place and click Add.

This will allow the script to login to the Monitoring Service in order to post custom metric data.

Create an OCI configuration file

For this exercise we will use the API Keys we just generated and we will create a config file in the host where the Standby DB is running using the oracle account.

I used the location /home/oracle/.oci in order to store the OCI config file and the private key. You may use another location depending on your internal standards.

Using the Configuration File Preview copy the contents and save them in the configuration file we are creating in the DB host.

This Preview already has the correct setting for the user, fingerprint, tenancy and region. However, you should amend the key_file setting. This setting is the path where your private key file is stored.

For this exercise it will be:

key_file=/home/oracle/.oci/mykey_private.pem

At the end of this, you should have 2 files. The config file and the private key file in the DB host.

[oracle]$ ls
config mykey_private.pem

Setup Python on DB Host

For this exercise we are going to use Python in order to consume the required REST APIs to post the metric data to the Monitoring Service.

Verify the Python installation on the DB Host using the oracle account. Python3 was already installed on this host.

[oracle]$ which python3
/bin/python3

However we need to install the oci module in Python. Before we install the oci module we need to upgrade pip in Python.

For this, logout from the oracle account and use the opc account. Execute the command below:

[opc]$ sudo pip3 install --upgrade pip

Login again with the oracle account and execute:

[oracle]$ pip3 install -U oci

This should install the oci module correctly.

Step 2 – Create the Python script

In this step we are going to create the Python script that connects to the Standby DB, gathers the Apply Lag and posts the data to the Monitoring service.

Copy the code below and paste it into a file name post_lag_value.py

#!/usr/bin/python3

# This is a sample python script that post a custom metric(lag_value) to oci monitoring.
# Run this script on the client that you want to monitor.
# Command: python post_lag_value.py

import oci,subprocess,os,datetime
from pytz import timezone

# using default configuration file (~/.oci/config)
from oci.config import from_file
config = from_file()

# initialize service client with default config file
monitoring_client = oci.monitoring.MonitoringClient(config,service_endpoint="https://telemetry-ingestion.us-ashburn-1.oraclecloud.com")

os.environ['ORACLE_HOME'] = "<YOUR ORACLE HOME>"
os.environ['ORACLE_SID'] = "<YOUR SID>"

def run_sqlplus(sqlplus_script):

    """
    Run a sql command or group of commands against
    a database using sqlplus.
    """

    p = subprocess.Popen(['<YOUR ORACLE HOME>/sqlplus','-s','/nolog'],stdin=subprocess.PIPE,
        stdout=subprocess.PIPE,stderr=subprocess.PIPE)
    (stdout,stderr) = p.communicate(sqlplus_script.encode('utf-8'))
    stdout_lines = stdout.decode('utf-8').split("\n")

    return stdout_lines

sqlplus_script="""
connect / as sysdba
set heading off
SELECT extract(day from p.val) *1440 + extract(hour from p.val)*60 +
extract(minute from p.val) + extract(second from p.val)/60 lag_minutes
from (SELECT name,to_dsinterval(value) val from v$dataguard_stats where name ='apply lag') p;
exit
"""

sqlplus_output = run_sqlplus(sqlplus_script)

for line in sqlplus_output:
     if line.strip():
         lag_value=float(line)

print(lag_value)

times_stamp = datetime.datetime.now(timezone('UTC'))

# post custom metric to oci monitoring
# replace "compartment_ocid string with your compartmet ocid
post_metric_data_response = monitoring_client.post_metric_data(
    post_metric_data_details=oci.monitoring.models.PostMetricDataDetails(
        metric_data=[
            oci.monitoring.models.MetricDataDetails(
                namespace="<YOUR CUSTOM NAMESPACE>",
                compartment_id="<YOUR COMPARTMENT ID>",
                name="<YOUR METRIC NAME>",
                dimensions={'server_id': '<YOUR SERVER ID>'},
                datapoints=[
                    oci.monitoring.models.Datapoint(
                        timestamp=datetime.datetime.strftime(
                            times_stamp,"%Y-%m-%dT%H:%M:%S.%fZ"),
                        value=lag_value)]
                )]
    )
)

# Get the data from response
print(post_metric_data_response.data)

Amend the inputs needed depending on your DB and OCI configuration:

  • <YOUR ORACLE HOME>
  • <YOUR SID>
  • <YOUR CUSTOM NAMESPACE>
  • <YOUR COMPARTMENT ID>
  • <YOUR METRIC NAME>
  • <YOUR SERVER ID>

One important thing to mention is the ingestion service endpoint. I’m using Ashburn as my region, therefore my ingestion endpoint is “https://telemetry-ingestion.us-ashburn-1.oraclecloud.com”. Yours should be different depending on your region.

https://docs.oracle.com/en-us/iaas/api/#/en/monitoring/20180401/

Next, let’s make the post_lag_value.py file executable.

[oracle]$ chmod +x post_lag_value.py

Let’s try our Python script.

./post_lag_value.py 
/home/oracle/.local/lib/python3.6/site-packages/oci/_vendor/httpsig_cffi/sign.py:10: CryptographyDeprecationWarning: Python 3.6 is no longer supported by the Python core team. Therefore, support for it is deprecated in cryptography. The next release of cryptography (40.0) will be the last to support Python 3.6.
  from cryptography.hazmat.backends import default_backend  # noqa: F401
0.0
{
  "failed_metrics": [],
  "failed_metrics_count": 0
}

As you can see from the output of the file, the current lag is “0.0” minutes and the failed_metrics_count is also “0”. This means that we successfully posted this data to the Monitoring service.

Let’s now find out if our custom metric is visible from the OCI console.

Using the hamburger menu navigate to “Observability & Management” and under the Monitoring Service click on Metrics Explorer.

Inside Metrics Explorer choose the correct Compartment, Namespace and metric. Remember that you provided them in the Python script. Verify you can see data in the graph.

The script is now posting Apply Lag data to the monitoring service.

Step 3 – Schedule

Now we need to schedule the execution of our Python script every “x” minutes. For this I’m using a Cron job. Follow the instructions in the MOS note to enable Cron. How To Use Crontab In OCI DBCS? (Doc ID 2639985.1)

My Cron looks as follows:

[opc]$ sudo cat /etc/crontab
SHELL=/bin/bash
PATH=/sbin:/bin:/usr/sbin:/usr/bin
MAILTO=root

# For details see man 4 crontabs

# Example of job definition:
# .---------------- minute (0 - 59)
# |  .------------- hour (0 - 23)
# |  |  .---------- day of month (1 - 31)
# |  |  |  .------- month (1 - 12) OR jan,feb,mar,apr ...
# |  |  |  |  .---- day of week (0 - 6) (Sunday=0 or 7) OR sun,mon,tue,wed,thu,fri,sat
# |  |  |  |  |
# *  *  *  *  * user-name  command to be executed


# System should configure AIDE for Periodic Execution 
05 4 * * * root /usr/sbin/aide --check

*/5 * * * * oracle /home/oracle/post_lag_value.py >> post_lag.log 2>&1

I schedule this Cron job every 5 minutes. You may adjust it to your desired frequency.

Step 4 – Create an Alarm

Go to the Monitoring service and create an Alarm using the Alarm Definitions option.

After this, we will have a notification when the Apply Lag is more than 60 minutes in our Standby DB.

This concludes this small exercise of monitoring the Apply Lag for a Standby Oracle Database using the OCI Monitoring service.

Hope this helps,
Alfredo

Oracle Autonomous Data Warehouse – What is it?

Oracle Autonomous Data Warehouse (ADW) is one of the so-called DB as a Service (DBaaS) or probably we should call it Data Warehouse as a Service (DWaaS) with the difference that this service is completely automatic and autonomous.  

This service is comprised by an Oracle Database (of course) already pre-configured for analytics, data lakes and data warehouse workloads. This Oracle Database (PDB) has 18c features running on Exadata hardware. Oracle Exadata software is 18c with features like In-Memory delivered from the cell server.  

There’s a service console that helps to manage the ADW services.

On top of this, Machine Learning (ML) tools help with data analysis and data models.   Development tools like SQL Developer are useful to create objects, load data and more.  

Let’s now talk about tasks that happen automatically:  

Automatic statistics gathering during direct-path load operations

Automatic tuning

Automatic Partitioning

Automatic In-Memory

Automatic Indexing (soon)

Automatic Compression

Automatic Tablespace Management

Automated backups and patching  

ADW is also capable of repair itself. Machine Learning is used to detect anomalies and uses pattern recognition to determine if this problem is already in the problem knowledge-base. If is a known problem, it will apply the fix automatically.  

On the security side all the information is encrypted at rest. This means that backups and all data in the tablespaces is encrypted using TDE.

The connectivity between ADW and the rest of the world is secured be default. Oracle provides a wallet file that contains all the connectivity information required to login.

If you open this file you’ll notice that all connectivity is being done through SSL.

 (security=(ssl_server_cert_dn=… 

Provisioning is quite easy using the service console.   From the main dashboard you can click on “Create a data warehouse” button.

Select the Workload type between Autonomous Data Warehouse ADW or Autonomous Transaction Processing ATP loads.


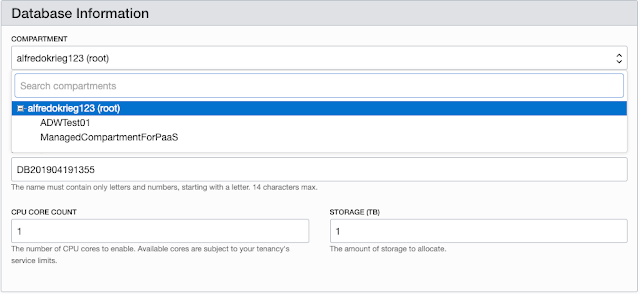
Next you choose a compartment where the ADW database is going to live. For this example I’m going to choose ADWTest01 compartment. It is not recommended to use the root compartment.


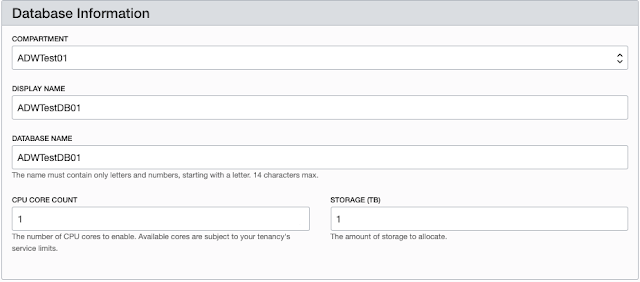
Then we are going to set the Display and Database names. For this example, I’m choosing 1 OCPU and 1 TB of storage. Keep in mind that ADW is elastic, this means we can add more OCPUs and Storage on the fly without the need for downtime.


From the Administrator Credentials section we are going to set the ADMIN account password.


Next is license type. You can choose to use a license that you already own or subscribe to a new one.


Last but not least is the Tags section. You can add a tag to this ADW database to better manage it inside your tenancy.


Let’s now click Create Autonomous Database and wait few minutes for OCI to provision it.


The orange ADW icon will turn green once the ADW database is fully provisioned.


In my next post I’ll cover how to connect o the ADW database and how to load data to it.
 
Thanks,
Alfredo

Configure Oracle Cloud Infrastructure’s VCN Network

Oracle Cloud Infrastructure requires a VCN (Virtual Cloud Network) to be created in order to connect to DB Systems (Bare Metal and VM). There are basically tow options to configure this VCN.
·       Public Subnet with Internet Gateway
·       Private Subnet
The Public Subnet with Internet Gateway will expose the network to the Internet. The Internet Gateway is a virtual router that provides a path for traffic between he VCN and the Internet. This option is mainly recommended for non-production workloads.


The Private Subnet cannot be reached from the Internet. You will need to configure a Dynamic routing Gateway (DRG) with either FastConnect or IPSec VPN on your on-premises site.


Once the VCN is created, you can associate the Bare Metal or the VM system to it. The navigation menu to create the VCN is Menu -> Networking -> Virtual Cloud Networks


Then click on Create Virtual Cloud Network and follow the wizard.


Once you create your VCN it will show as a (green) available icon.


More configuration information below:
Thanks,
Alfredo